If you Google to visit here, please read the previous article : iTunes for Windows 7 or Vista Troubleshooting (Part 1)
Please follow the steps below to disable the Windows 7 or Vista 3rd-party device filters:
- Windows 7 : Start menu : Search programs and files : type 'regedit' and ENTER.
Windows Vista : Start menu : Start Search field : type 'regedit' and ENTER. - Sometimes Windows need to authorizes permission before continue.
- Head to HKEY_LOCAL_MACHINE and expand the tree.
- Click SYSTEM : CurrentControlSet : Control : Class
- Select the header displays {4D36E965- (do not click the + sign here). The screenshot should like below :
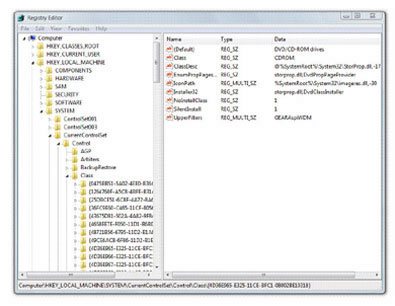
- Select menu : FIle : Export
- When opens a dialog box, please ensure the "Selected branch" radio button is selected and save the file as you like.
- Right-click the LowerFilters key and go to the menu of shortcut, click Delete. P.S.: If you can't find a LowerFilters key then head to the step below.
- Right-click the UpperFilters key. From the menu of shortcut, click Modify. If the UpperFilters key is not available, please create a key for it by following steps in iTunes for Windows: "Registry settings" warning when opening iTunes.
- Select the whole contents in the Value data text tab.
- Right-click the text selected, from the menu of shortcut, click Cut.
- Type GEARAspiWDM and press ENTER. Pressing ENTER adds a CR in the field and is important.
- Click OK.
- Restart the PC.
If the above procedures solves the problem, that means the device filter key from other software was creating trouble with CD or DVD drive software setup with iTunes. At that moments, the CD or DVD drive software (or disc burning software) may not function properly until re-installed the entire software. To prevent the trouble again, please search if there is any updated version of your CD or DVD drive software or Disc Burning Software before re-installing it.
It the above procedures can't solve the problem, please head to the registry and resume it as below steps :
- Fire up the Windows Registry Editor (Regedit) that was mentioned in steps 1 and 2 in the above procedures.
- On the menu of File, click Import. Find the file that you have exported in the above steps.
- Exit Registry Editor and restart your PC.
- To simply the Backup/Restore procedure of the Windows Registry, we recommend to use the advanced Windows Registry Software such as Registry Winner, Registry Easy, ErrorFix or Registry Fix.
0 意見:
Post a Comment